| | Dirt-Bagz Saddlebags Installation on a KLR650 | | Best viewed with Firefox/Mozilla based browsers. |
| | | | I wanted my KLR to be able to take me to the ends of the earth and back... or maybe just as far as work. In either case, it brings up the question. "How am I going
to carry stuff?" Carrying stuff leads to saddlebags, panniers, tail bags, tank bags, fender bags, backpacks, bungee cords, and the handyman's secret weapon - duct tape. I chose to go with saddlebags. | | Not the giant aluminum
cans that hardcore adventure touring posers go for, but something more practical. A setup that's easy to remove, unobtrusive, carries the weight as low as possible, and doesn't require a small army to right your cycle in the event of a lay down. Besides,
unless you're leaving North America or Europe, no one really needs to carry that much stuff! Dirt Bagz are just the right size (NOT bulky) and you'll never know they are there while you ride. The design offers a frame that attaches firmly in place and the
bagz are made from a rugged material & stitching. Keeps the heavy stuff off your back on longer trips! | | Dimensions | | Overall
Capacity (ea) | 11.5 Liters | | Overall Height | 12.75" | | Overall Length | 11.5" | | Top Width | 6.0" | | Bottom Width | 4.0" | | Overall Weight | 4.6lbs | | Manufacturing Specs | | Fabric | Cordura | | Denier | 1000 | | Interior Stiffener | 1.5mm plastic | | Design Specs | Covered zippers
Quick
disconnect forward strap
Tapered design for minimal width |
|
| | |
| | | | Original Brackets The original brackets are perfectly functional. They hold the bags firmly in place and allow for quick removal, but that's just not good enough. The right side mount is one inch higher
than the left side mount, so they look crooked, and the brackets don't prevent the front of the bags from touching and marring the easily scuffed side skirts. I'm assuming the idea behind the higher right side mount is so that the loop shaped mounting tab
aligns evenly with the muffler thus minimizing the chance of the bag touching the hot exhaust. Unfortunately the tab isn't big enough to have any effect on exhaust clearance and just causes the right bag to sit higher than the left bag. I'm also assuming
that the manufactures believed that most people don't care really care about the appearance of their vehicles so why not save themselves $1.26 worth of tubing on every set. | | | 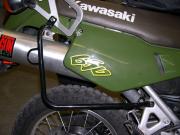 | |  | | Right Bracket. I forgot to photograph the left bracket before modification, but it looks the same. | As you can see, there's plenty
of clearance around the Big Gun Muffler | | |
| | | | Step 1: Move the
right side tab. Mount both brackets to your cycle, stand it straight up, and measure the height of both the left and right bag mounting tabs from the ground. Subtract the lower left side value from the right side value and you'll get the amount
you'll need to lower the right tab. On my KLR the measurements turned out to be 32 and 33 inches respectively. This means I needed to lower the tab one inch. Remove the powder coating from the surrounding area with a rotary wire brush or sander, cut
of the tab with a hacksaw, (You can use a power tool here but be careful not to gouge the main tube.) and weld it back on in its new position. Once the tab is welded in place, use a file or grinder to smooth out the spots where the tab was originally mounted.
| | |  | | 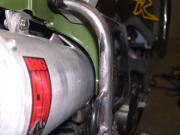 | Tab tacked in its new position.
Yellow arrows point
to original tab position. | I use a Miller Dynasty Tig Welder but a even a cheap Mig welder should do just as well as long as you're careful to protect the
plastic panels from spatter. | | |
| | | | | | | Step 3: Form the new right side bag support bar. This is the hardest part. The right
side bar requires two bends. One to form the loop and one to curve under the extended right side panel. Start with a 19 inch length of tubing. Place a mark 7 3/8 inch in from one end, the upper rear end, and make the 45 degree bend as before.
Then make another mark 6 1/2 inches farther down and make a gradual 30 degree bend in towards the original bar. Check the fit often and make any adjustments necessary. Don't forget to cope the ends for a clean and tight fit. When everything
looks like a perfect fit, tack the bar in place, let cool, install the right bag, and check the fit. As before, make any necessary adjustments and finish welding the ends of the new bar to the old. That's it, except for finishing. | | | 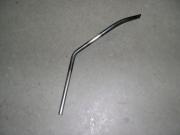 | |  | | Finished bending new bar. Go slow or the tubing may distort like the lower bend here. | Another
view of the new bar. | | |  |  | | Finished right bracket | Another shot of the new bracket.
Check
out the bend around the side panel. | | | 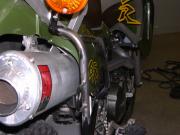 |  | | The new bar provides plenty of exhaust and side
panel clearance. | Another clearance shot. | | |
| | | | Step 4: Cleanup, powder coat, and mount. Ok, you don't really need to have the brackets re-powder-coated. Just remove all the old powder coating, give them a coat of enamel primer, and then a couple coats of epoxy paint.
You can restore the original black or paint them to match the KLR's frame. Note: If I did this again, for a cleaner look, I'd probably cut off the front loops and re-weld them on the other side of the new bar. | |
|  | |  | | Pre Powder coated | Finished | | | 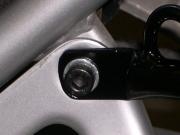 | | 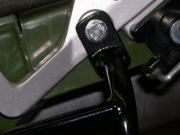 | | The setup comes with 8mm bolts, but I like cap screws. | Unfortunately, I couldn't find 55mm ones for the rear, so I had to use 8Mx55 Bolts. |
| |
| | | | Step 5: Throw on the saddlebags and go. | |
|
 | |
 |
| Left Side Bag | Done | | |
| | | | |
|